GUNS! GUNS! GUNS!
Article #1 The Ruger .44 Carbine: A Legend That Lives On - Sort Of . . . by: M. P. McClung
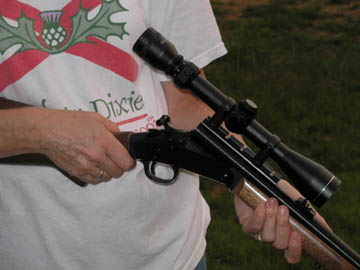
I'll go ahead and say it and get it out of the way: the Ruger .44 Magnum Carbine rifle is one of the best whitetail deer rifles ever made. I can hear it already -- I can hear the scornful moans and sarcastic laughs from the 7mm Magnum mega-cannon crowd. I have heard it all before. I have heard how the .44 Carbine is underpowered, how it has too short of a range, how it is simply a glorified long-barrel pistol. William Ruger, Sr. designed and introduced the .44 Carbine in 1960 and 1961 respectively. This little autoloading rifle was available from 1961 to 1985 (actually new ones were still on the racks in gun stores in 1986). Recently a gunsmith told me when I asked about parts for the .44 Carbine that the rifle was practically a failure for Bill Ruger and Company and that Mr. Ruger discontinued the model after only a few short years; I, however, beg to disagree with the gunsmith. Any specific product model -- firearm, automobile, television -- that has a retail life of 25 years is a glowing success in my opinion. The .44 Magnum Carbine is, admittedly, a 100-yard medium to big game rifle (a practiced shooter with a good scope can get 125-yard shots with decent accuracy). I don't worry about the short range of the Ruger Carbine because here in Alabama where I usually hunt, most deer are killed at 85 yards or less; in fact, a good many of the deer that I have seen harvested here in north Alabama have been killed at less than 40 yards. Most of the deer killed from tree stands in Marion County where I hunt are shot at distances better measured in feet than in yards. Furthermore, a deer hit in the vitals with a .44 Magnum round hits the ground right there! I've never seen a deer move even two steps after taking a hit from a .44, but I have seen a large doe hit with a 7mm Magnum round in the vitals run nearly 80 yards in thick, nasty, briar-infested cover before she finally fell. But there are those who still discount the .44 cartridge as being ineffective and outdated if it cannot hit the mark at 300 or 400 yards like their super-ultra-magnum can. At a gun show a couple of years ago, I asked a gun dealer about availability of used .44 Carbines and he quickly dismissed my question with, among other insults, "the .44 Carbine ain't worth a shit at any distance." I've never suggested that this rifle was made for hunting mule deer on the wide open plains of Montana or Wyoming; I'm merely saying that the Ruger .44 Carbine is, for reasons I'll mention below, the best rifle for whitetail deer in moderate to heavy cover, which is where a lot of hunting takes place here in the South. From its beginning in 1960/61, the .44 Carbine from Ruger was made with three styles of hardwood stock: the standard carbine style with a curved buttplate, the Sporter style (which is more commonly known as a Monte Carlo stock), and the International style (which is commonly called a Mannlicher stock). Regardless of the particular style, the stock was a single piece of hardwood that made up both the stock proper and the fore-end. From my observation, 95% of all .44 Carbines came with the standard stock with the curved buttplate and no checkering of any kind; I feel that this is the most desirable stock available with its compact design and its comfortable, handsome thick fore-end for quick, easy handling. My father-in-law owns a rare .44 Carbine with the Monte Carlo stock, and this is the only one I have ever actually seen and handled. Examples of the .44 with the International stock -- a strange looking creature that has its hardwood fore-end extending and tapering all the way down to the tip of the 18.5" barrel -- are exceedingly rare, and I have never personally seen one. The rifle has a variety of official and unofficial names. When the Ruger company first began to sell the rifle, it was stamped with the name DEERSTALKER on the receiver, but a conflict with the Ithaca company who had a shotgun or rifle with a similar name caused Bill Ruger to simply change the name of the rifle to Ruger .44 Carbine. Some folks also refer to the rifle as a 10/44; this name would seem to indicate a companion model to Ruger's very popular 10/22 rifle (the ultra-famous semi-automatic .22 rifle that shares essentially the same shape, dimensions, and stock of its big-bore brother). I have never seen the 10/44 name in any literature from Ruger, so I suspect that this name is a reasonable and understandable adaptation of the 10/22 name. The best source for history and rare photographs of the .44 Carbine is Duncan Long's THE STURM, RUGER 10/22 RIFLE AND .44 MAGNUM CARBINE; however, it is my view that Long is - pardon the pun - long on 10/22 info and short on .44 Carbine info. R. L. Wilson's history of the Ruger company is a good source of history as well on the .44 Carbine, if you're willing to spend over $50 on a book. Another point that I should make is that the .44 Carbine is a great looking rifle. Bill Ruger has described the receiver as "beautiful" and "elegant." Ruger, who designed the dimensions and style of the rifle himself, is absolutely right. The flat, broad receiver is one of the most attractive features of the gun. From its wide trigger to its ultra-comfortable stock to its smooth harmony of barrel attached to stock with the traditional carbine barrel band, the .44 Carbine is a pleasure to behold. It is a short, small rifle that, to me, is the equivalent of a small, powerful sports car: compact, deceptively powerful, loads of fun, and addictive. When Ruger discontinued the .44 Carbine in 1985, these rifles could be bought used for $100-200 depending on condition. It seemed that nobody wanted one and that the price would continue to drop to a point where in the future, owners of the .44 Carbine might pay someone just to take it and get the loathsome thing out of their gun cabinet. Mack Brown is a gun store owner who lives in Hamilton, Alabama, and he recently told me that in the late 1980s, he had EIGHT Ruger .44 Magnum Carbines that nobody seemed interested in purchasing lined up on his used rifle shelf. The story is quite different now some twenty years after the rifle's production end; Brown not only cannot keep a .44 Carbine on the shelf for more than a day or so, but he will eagerly offer to buy .44 Carbines from customers who bring them in for service or repair. As I said, in the mid to late 1980s, a used example of this rifle could be had for less -- sometimes much less -- than $200. Here in 2005, Ruger .44 Carbines bring $350 to $400 consistently at gun shows. The one exception to this is the 25th anniversary model made in 1985. This Carbine came with the Ruger flaming phoenix medallion embedded in the stock, and I have seen printed values of $700 or more in the gun literature. The truth is that practically no one will sell a 1985 25th year edition for any amount of money. Mack Brown, whom I mentioned above, has a 25th year edition that has never been fired and is still in its original Ruger box. The irony is almost overwhelming: no one will admit to hunting with the .44 Carbine and many fellows, it seems, enjoy verbally bashing the rifle from time to time, but amazingly very few people will sell one from their gun rack. I'm beginning to suspect that ashamed hunters everywhere are sneaking into the woods with their easy-to-carry and easy-to-aim .44 Carbine, just hoping and praying that their buddies won't catch them with such a dog of a rifle. I have been to two gun shows recently where dealers had tables lined with thousands of used rifles of every brand, and at the two shows, I have seen only four .44 Carbines. I bought one of the four, and I had two offers on it as I walked out of the coliseum leaving the show. Somebody out there, it appears, is using that rifle for something. In his outstanding book RUGER AND HIS GUNS, author R. L. Wilson describes the tests the .44 Carbine was put to just before the Ruger company began to sell the rifle in the early 1960s. Wilson documents how Bill Ruger and some of his staff hunted on the plains and wilds of Africa, killing everything from leopards to gazelles (some at distances of 100 yards). An African safari guide was even so impressed with Ruger's new .44 rifle that he carried one into a dense thicket as he was trying to flush out a large lion! In 1996, Ruger sort of revived the .44 Carbine. They came out with a rifle that is almost an identical twin to the old autoloading .44, but the biggest difference in the new Carbine is that it is a lever action. The rifle is called the 96/44. The 96/44 has the solid, dependable feel that Ruger owners expect, and it displays Ruger's typically good attention to fit and finish. However, gun experts whom I've talked to have had a reaction that is far less than enthusiastic about the new .44 Carbine, and gun store owners have commented that sales of the rifle have been disappointing (probably due to the rifle's high price of about $420). Then in 1999/00, Ruger issued the 99/44 - an autoloader that only nominally resembles the old original (new military-like receiver, new internal mechanics, and new stock inspired by the wood on a Mini-14 or Mini-30). With lackluster sales of both the 96/44 lever action and 99/44 auto, the Ruger company is likely to discontinue both models soon. Sturm, Ruger & Company may well have been economically forced lately into the same sad reality of most companies and organizations -- more interested in profits than in art or nostalgia.
August 20, 2005
Article #2 Maximum Point Blank Range by: Dustin
Modern hunting has brought about innovations that help us rule out uncertainties in our sport. Range Finders, Weather Gauges, Crystal Clear Optics and Game Cameras to name a few. Once we've got the picture, know the range and confirm the identity, almost all that's left is to take the shot.
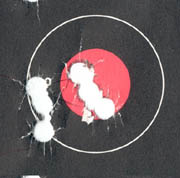
Let's look at a not so new concept that will make that shot a little easier. Maximum Point Blank Range (MPBR)- This is the maximum distance a hunter can hold on a target and be reasonably assured of a hit in the vital zone. The game in question is of course the Whitetail Deer. The Whitetail deer has a vital zone of approximately 10 inches.
Many folks drag out to the range and sight in dead on at 100 yards. This is fine if your area of hunting limits you to 100 yard or less shots. Timber and Game management practices now present situations for shots well over 250 yards. Powerlines, large greenfields and open farm land just to name a few. To achieve a Maximum Point Blank Range for the Whitetail deer and it's 10 inch vital zone will require some research.
First glance tells us that with a 10 inch vital zone, the trajectory of the bullet can neither rise nor fall more than 5 inches. Rise 5 inches, Fall 5 inches, 5 inches + 5 inches = 10 inches.
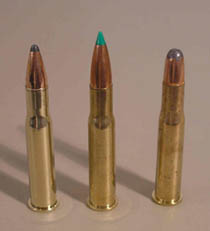
Selecting the proper zero for the cartridge will determine our MPBR. Let's take a look at the reliable 30-30 winchester.
Cartridge Details: Weight= 150 grains B/C= .218 Muzzle Velocity= 2400fps Zero= 100 yards
This tells us that our MPBR is approx 180 yards when zero is 100 yards.
This is the same cartridge with a zero of 185 yards.
Even without access to a 200 yard range, it's possible to sight the rifle in 3 inches high @ 100 yards for a zero of 185 yards.
Most people will tell you that the 30-30 is not much use beyond 100 yards. Thanks to old fashion know how and new fangled gadgets, we can now venture out with the trusty 30-30 Winchester Model 94 knowing that even using iron sights, a hold dead center at 200+ yards will strike in the vital zone of the Whitetail deer.
August 29, 2005
Article #3 The NEF Handi Rifle by: squeezebox
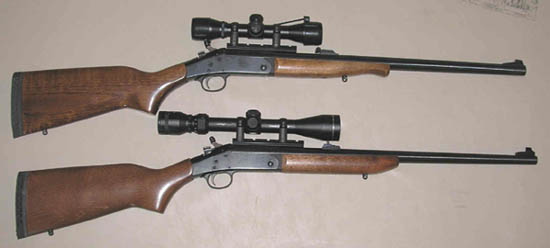 Many hunters pride themselves on their fine rifles, and rightly so. Who wouldn't want to carry a beautiful Ruger 77, a pre-64 Winchester 70, or a finely-figured Claro-stocked Weatherby into the woods? Anyone who's nice gun has been beaten up from getting into a cramped shooting house before daylight, or who can't spend the better part of $1000 on a rifle, that's who. Synthetic stocks and good quality, moderately priced rifles seem to be all over place now, but one Ugly Dog of a Rifle seems to be gaining in popularity with each passing year- the New England Firearms Handi Rifle. With these plain, rugged rifles available in calibers from .22 Hornet to .30-06 with interchangeable barrels in a variety of chamberings, and selling for less than $200, many hunters are buying these single shots for their families and for themselves.
The Handi Rifle is basically the H&R single shot shotgun receiver strengthened to handle to pressures of high power rifle cartridges. The external hammer and action release catch operate exactly the same as the familiar break-open shotgun. So is a $200 rifle any good? How do they shoot? What about mounting a scope? Why would anyone in his right mind hunt with a single shot anyway? Glad you asked. These guns have a cult-like following, and the two most popular cartridges according to surveys I've seen of Handi Rifle owners are, believe it or not, .30-30 Winchester and .45-70 Government. Since I just happen to own one of each, let me tell you what I've learned about them. First, the fit and finish is about what you'd expect if you're familiar with the H&R shotguns. Though they are available in both synthetic and laminated stocks, most are the stained hardwood "palletwood", with shotgun-type recoil pads. Calibers such as the two I own come with open sights, while those in the .30-06 class come from the factory with plain barrels and scope rails. The trigger on my .45-70 was a bit stiff, so off it went back to NEF for a free adjustment. It cost me $12 in shipping, with a two week turnaround. The .30-30 is two years newer, and it's trigger was light and crisp right out of the box. Sling swivels studs are factory installed. Because of the external hammer, high scope rings are required, though you may be able to get away with using medium rings from some manufacturers. My Handi Rifles both wear Burris Zee high rings, which are made for Weaver bases. The Redfield high rings sold at Walmart for about $20 look as though they'll work just as well. There's plenty of room to cock and decock the hammer using the hammer spur, even when wearing gloves.
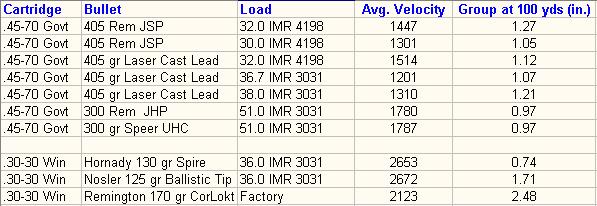
Mounting the scope high means resting your jaw on the stock instead of your cheek, but I don't find that to be a problem. Some calibers (and the Ultra model of the NEF) have Monte Carlo stocks, and one can be ordered as a replacement or a lace-on cheekpiece added if a high scope bothers you. Standard barrel length is 22", but remember, these rifles have no "action" so the overall length of the gun is comparable to a bolt action with a 19"-20" barrel. So they are very "handy". With a compact scope mounted, carrying one of these around is much less of a chore than toting a 9lb rifle/scope combo-- especially during a long day when you're going on 3 hours' sleep. I've had the .45-70 longer, so it's had more rounds through it and more experimentation with different loads. It has its favorite loads, but I have yet to find one that it will not shoot accurately. Loads tested included:
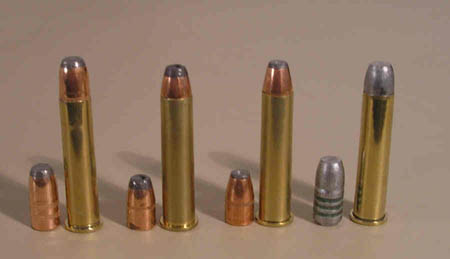
L-R:Rem 405 softpoint, Rem 300 JHP, Speer 300 UHC, Lasercast 405 RNFP Lead All loads tested were Trapdoor level loads. With these loads, recoil from the NEF was a big shove and they were fun to shoot. The rifle can handle the higher pressure Marlin and Ruger level loads, but recoil becomes pretty brutal in such a light gun as the higher end is approached, so I'm content to stay in Trapdoor territory. The .30-30 has been around forever, and the round nose 150 and 170 grain bullets have taken more deer than anyone can count. But the NEF has no tubular magazine to worry about so different bullets can be used to improve performance downrange. Load tested were:
L-R : Hornady 130 Spire, Nosler 125 Ballistic Tip, Rem 170 CorLokt factory load.
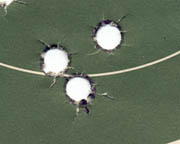
The .45-70 was designed around a 405 grain lead bullet, and it does very well with them:
L-R:Two 50 yard groups. The same bullet at 100 yds.
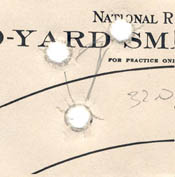
Remington 405 gr at 100 yds The .30-30 preferred the Hornady 130 gr Spires and the Nosler 125 gr Ballistic Tips over the 170 grain Green Box Remingtons.
Hornady 130 gr Spire at 100 yds Here's a list of the best loads tested (many were worse, especially the accuracy of ball powder loads in .30-30). The 125 and 130 grain loads listed here are the max book loads from IMR for the .30-30 in the T/C Contender. Don't use these in a lever action. All loads taken from loading data from powder and bullet manufacturers:
Finally, what about hunting with a single shot? How do you carry spare ammo, and how fast can you reload? Elastic stock cartridge carriers are cheap and effective. I also have a neoprene sling with cartridge loops that come in handy. What I like to do is have a round in my shirt or coveralls chest pocket, ready to go in case I need to reload in a hurry. I've not had to take a second shot while hunting yet, so I can't say which works best. But with a little practice these single-shots can be reloaded faster than you may think. Besides being a lightweight, accurate rifle, NEF has a barrel accessory program where a barrel for any of its rifle calibers may be fitted to any Handi Rifle receiver (they can NOT be fitted to SB-1 shotgun frames) for around $100-- more info at:
http://www.hr1871.com/barrelAcc/index.htm Graybeard Outdoors also has an excellent forum for these rifles:
The NEF Handi Rifle may be inexpensive, but it shoots. I'll have one of mine in the woods with me opening morning.

September 12, 2005
Article #4 Stiffen Forearm, Float the Barrel, Bed the Action, Camo the Gun by: bamachem
I have a Howa 1500 in 270 Winchester Center Fire that's topped off with a Zeiss Conquest 4.5-14x50mm scope. This is one fine shooting gun that is far more capable than most sub-$1000 setups out there. Here's how I got it to shoot 0.10" groups at 100 yards. First, I floated the barrel. Then I bedded the action. Why would these two things make the gun shoot differently? What you are doing is eliminating the random little changes in the interface between the gun and the stock that take place over time that can, and will throw a shot off. Floating the barrel is basically remove any part of the stock that could touch the barrel on one shot while leaving it untouched the next. You make the stock fit the action so that when you take your gun apart it fits back together exactly the same every time. By bedding the action, you change the stock so that it fits up perfectly for your action, exactly the way it was milled. This allows for consistent mating of the action to the stock which will give you more consistent shooting results in not only all kinds of weather, but also after you break down your gun and put it back together. By having the stock fit the action perfectly, you eliminate the little changes that can occur during reassembly that can change the point of impact. What all of this means is that you have the same resonance vibrations all the time. This also means that you're getting the most out of your rifle's accuracy on every shot. Here's what you need to do to FLOAT THE BARREL: Some people will use assorted hand files and some will use dowels with sandpaper glued to them to fine tune a stock in order to float a barrel. I personally like to use a dremel with a router cutting bit and a sanding drum. First, remove the barrel/action from the stock. Take a close look inside the forearm (composite stocks) and see what's in there. For a wood stock, the forearm will need to be sanded, but no stiffening will be required. The forearm of my composite stock was almost hollow with just a few rib supports that didn't really provide much support. The forearm was pretty flimsy and would actually touch the barrel if you put any pressure on the forearm at all. I knew that any changes like this from shot to shot could cause changes in the point of impact, so something needed to be done. I used the dremel to remove all the plastic ribs, essentially turning the forarm into one big plastic C-channel under the barrel. I then used some 1/2" aluminum angle stock from home depot and a couple tubes of clear epoxy to stiffen the nowly hollowed out forearm and give it some MUCH NEEDED strength. I started by fitted the aluminum angle into the forearm and trimmed where necessary so that I had a piece going down each side of the forearm to stiffen it up without overlapping at the narrow end. I used the dremel and a router bit to drill some shallow holes at various angles into the forearm material (careful not to punch all the way thru) and then I drilled a few holes in each piece of aluminum. I then roughed up the plastic really good and layed in a layer of epoxy, put the aluminum back in, and then covered it in epoxy. This gets the forearm stiff and strong so that you can properly float the barrel. I used JB Weld on my forearm project and clear 2-part epoxy on the action bedding, but on more recent work, I just used the epoxy on both and they've held up fine. Just make sure to get an epoxy that says it will bond to both plastic and metals AND make sure to rough up the surfaces and drill a few small holes at different angles for anchor points and you'll be fine. I let that dry a day or two and test fitted the barrel and slid a $1 bill between the barrel and the forearm and took mental note of where the snags were. I then removed the action and barrel again and went to work with the dremel to remove the snags. I repeated that as many times as necessary until I could slide a business card (wrapped around the lower part of the barrel) all the way down to where the barrel met the action. Take your time and don't take out too much material at a time. You want a snug fit, but nothing from the stock should touch the barrel. Here's what you need to do to BED THE ACTION: Now that you've floated the barrel, you might as well bed the action. You will need the dremel to remove some of the plastic where the action seats to the stock, some vaseline, and some more epoxy. The area that you use the dremel on will be the flat "pads" where the action bolts go thru the stock, on the inside. You use the dremel to knock them down just a bit all over, but leave just one little bump near the screw hole so it won't change the seat depth of the action in the stock when you screw them down in the epoxy before it hardens. Now coat the action of the gun in a thin layer of vaseline so the epoxy won't stick. Lay down some epoxy into the bedding areas, being fairly conservative w/ the amount. Set the action and screw it down just so it's snug. This will force the epoxy into the voids and will create a perfectly matched stock for your action. After a decent amount of drying and curing (according to the epoxy directions), remove the action (may take a couple taps on the end of the barrel to break it loose the first time) and inspect the bedding. It should be smooth w/ no voids or "valleys" where the action didn't make contact. If there are, then rough them up, add another thin coat of vaseline to the action, add more epoxy to the problem areas and then repeat the process. When you're done, you'll have a bedded action - essentially making the stock fit your action perfectly. Here's what you need to do to CAMO THE GUN: Next is the camo job. Tape off anything that you don't want painted. Use acetone or mineral spirits to clean all the oil off the gun. I mean ALL OF IT. Sand the stock w/ some 180 grit to rough it up ever so slightly and hit the metal w/ 220 or 320 just a tad. Wipe it down again w/ some more cleaner. Get it nice and clean, tie some fishing line thru the sling swivel on the forearm and one thru the sling swivel on the butt of the stock and hang it from your garage door frame or from a tree limb. Now clean it again to get any fingerprints off and any leftover oil/solvents. Use automotive dark grey primer and coat everything w/ a thin coat - remember, the thinner the better on something like this. Let it dry 20-30 minutes and do another very light coat (Spray paint is fine to use on the gun and is easy to touch up. However, I have an airbrush set and used the flat testors paints to camo the one's in the pics - you will have the same results w/ the spray paints. Make sure to use FLAT paints - no gloss.) Now spray the gun with some flat olive drab, flat black, and flat brown, but sparingly, allowing the grey primer to show thru in spots. Now use some oak leaves, twigs, maple leaves, etc as reverse-stencils and hold them up to the gun and paint all around them - lightly - to create a "shadow effect". Repeat this w/ olive drab, black, dark grey primer, flat brown, and flat tan. Repeat for a few minutes w/ alternating colors and stencils, let dry and then do another layer. VERY THIN LAYERS are the key and let the layers get very very light as you do more layers, allowing the shadows from underneath show thru. You will want your last layer to be the darker colors, but still allow some of the tan and olive to show thru. After you're done with the paint, this should be what you'll get: 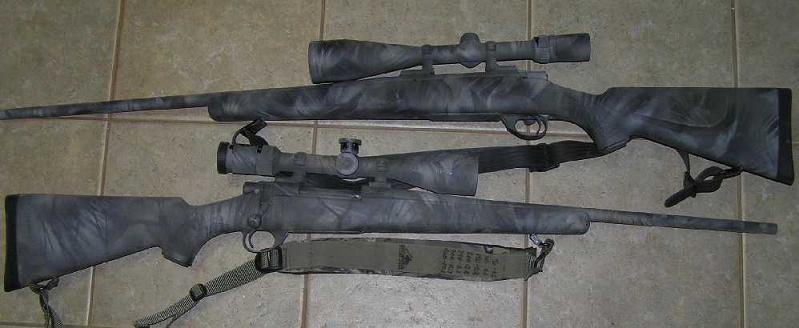
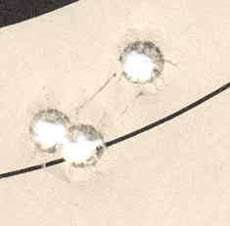
My Howa (bedded action and floated barrel) shoots a 0.375" 3-shot group consistently on Federal Silver Ballistic Tips boxed ammo at 100 yards from a bench - not a vise. I was able to get one 3-shot group touching last time I went to the range - a 3-shot group with a center-to-center interpretation of 0.10"!
December 9, 2005
|